Monday, January 29, 2018

SJ Designs January Challenge

I love, love, love bracelets and think I'm getting near to having more of them than I do earrings!  Not that I get to wear them lately - with Baxter in his "land shark" phase, pretty much any jewelry that dangles is out.  As are skirts, loose pants, long cardigans, coats, gloves ..... I'm looking quite rag tag in my torn puppy jeans and coat.  But I will hopefully, someday, be back to wearing jewelry again, so I made a bracelet for this month's challenge as a reward for making it through all that puppy nipping!

For January, Sarajo's husband Eric went full out colorful with this gorgeous photograph he took of a lorakeet.  You can read what he wrote about this month's challenge photo here.

Eric Wentling
I've had six sets of round and square beads sitting in my studio waiting for rainbow glazes and this was the nudge I needed to get them finished.  They're terracotta and I glazed them in the majolica tradition - first with a white satin glaze and then topped with several coats of overglaze.


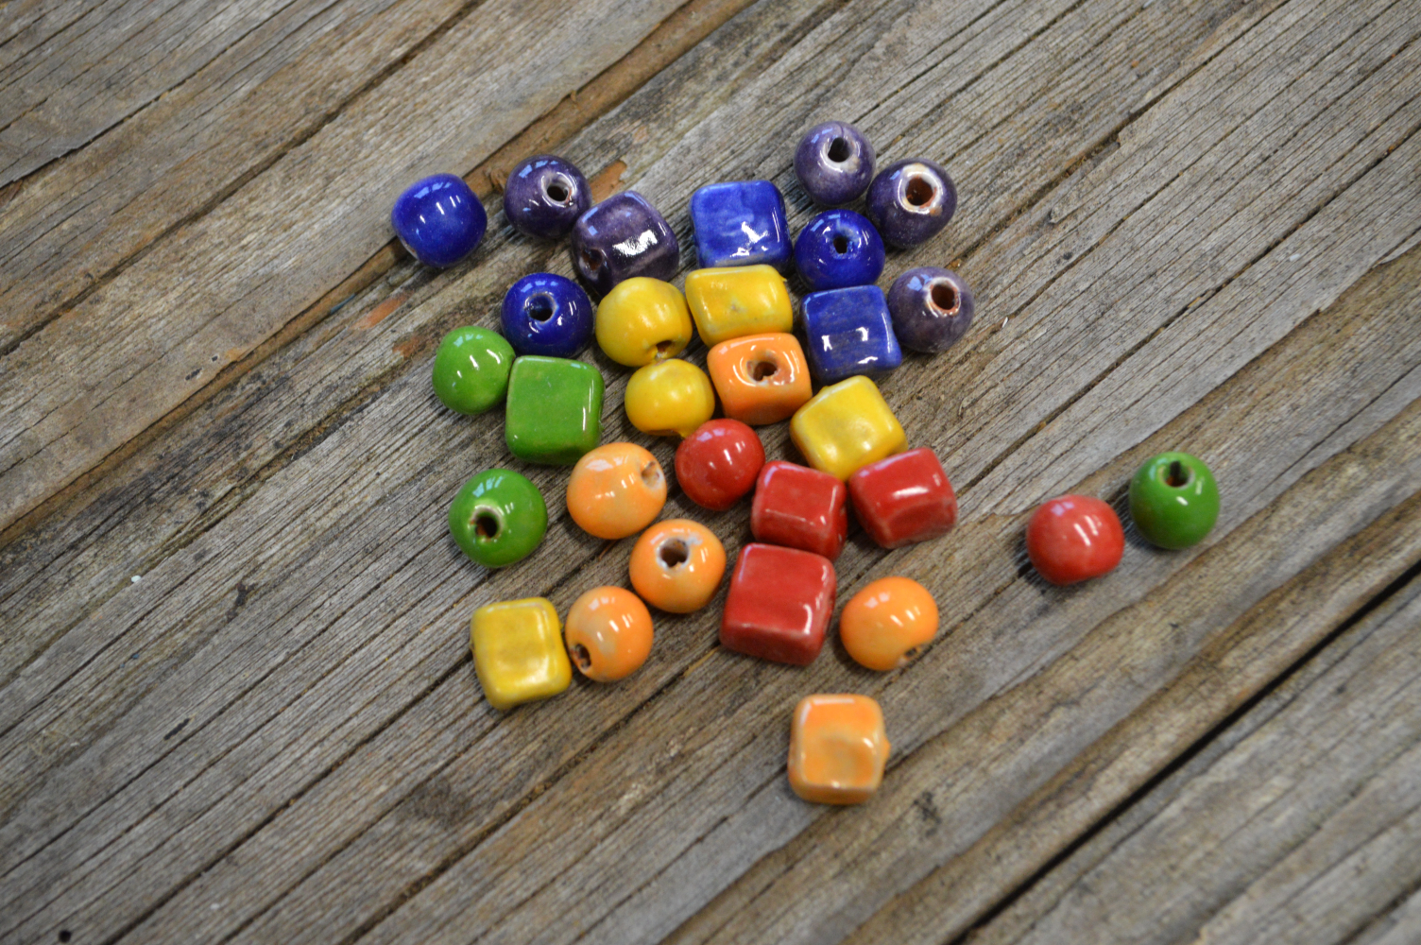
I love rainbows and these turned out just as I had pictured - not something that's been happening regularly lately!  Next I needed to decide how to put some together and after several starts I wasn't completely happy with, I decided on this ...


The birds are copper mass produced beads I've had forever and the black beads are glass.  Sets of the rainbow beads are not up in my online store yet, but should be sometime tomorrow.  

I wasn't sure if I was going to be able to get any beads entered in the Art Bead Scene Studio monthly challenge after several kiln mishaps, but I just squeezed in these beads from sprig molds I made with lavender from our farm.  


They have multiple layers of stain and are finished with a clear fired glaze.  Several of these are up in the store now at stoneypointstudio.com  Below is the inspiration photo for this month and you can see how others interpreted it here

Spring, Frances MacDonald, c.1900-1905, watercolor on linen.
And be sure to stop by Sarajo Wentling's blog here to see the gorgeous pieces she was inspired to make (the colors are so beautiful!) and what jewelry others made.

Happy Creating!  Deborah


Friday, January 26, 2018

Friday Inspiration - The Silk Paintings of Muza Kirnizkaya

Recently, I was looking at silk painting techniques and came across some amazing work by Ukrainian silk/batik artist Muza Kirnizkaya.


I can't find out much about her except that she's been working with silk for at least 40 years.  She has a website here and a Flickr page here with many of her designs.


I think one of the most intriguing things about her work is the way she works with value.  The forest scene below has so much light play going on, giving it depth and texture - and also a magical look and feel!


There are several videos you can watch from this page showing Muza working and teaching workshops.  Even though I couldn't understand what was being said (in Russian?), it was fascinating to watch her process and very interesting to look at what tools she used.

These make me want to get out my silk paints, even though I already have too much going on!  If you're interested in getting a start with silk painting, I have a series of beginning lessons starting here.

Happy Creating!  Deborah

Saturday, January 20, 2018

We're All Ears January Challenge

I'm a day late getting these earrings posted from Erin Prais-Hintz' Earrings Everyday January challenge - puppies these days require as much scheduling as do children!  There's weekly puppy play group, training, check ups and shots, daily socialization trips to plan ... but with a sweet face like this, Baxter's worth it!


So, back to earrings!  Erin's challenge this month was ultraviolet - as in Pantone's color of the year (see this past post).  I already had a few ultraviolet beads in the works, but hit a wall with a couple of kiln loads that did not turn out as I expected.  Luckily, these sweet little hearts with daisies made it through!


After the last few months of more ornate earrings, I wanted something simple and used only a few beads.  However, I also wanted some "pop" to the earrings, so I gave the daisies a yellow center and  also used matte finished yellow honey opal beads.  Purple and yellow are complementary colors, each contrasting with the other to add more vibrancy.  I added in a copper lustered crystal for that extra sparkle!

Be sure to visit Erin's post at Earrings Everyday here to see her take on ultraviolet earrings along with several others' who joined in.  Purple is one of my all time favorite colors, so this was a real eye feast for me!  And there were so many different types of beads used ... tin, gemstones, crystals, lampwork glass, lucite, ceramic, silk, and more.

Edit:  I now have one pair of the small daisy heart beads up in my online shop - stoneypointstudio.com

Happy Creating!

Deborah

Friday, January 19, 2018

Friday Inspiration - Snowdrops


Our snowdrops are blooming!  Even in a winter like we're having this year that's mild with warmer, sunny days interspersed, it's still so heartening to see them pop up!  Spring will come!  For those of you going through a snowier, icier winter, I found some quilting inspiration - it just seemed like it should be quilting to keep us all warm and toasty.

This pillow cover from Textile Dreams would also make a good quilt block.  I like different fabrics that were used for the background - the orange really makes it all stand out!  I could definitely see this as the beginning of a spring flowers quilt that would feel fantastic in those final days of winter.


This design by UK artist Carol Arnold is actually a stained glass window, however wouldn't it look lovely as a tile quilt square?!  I can see the background being batik.  And again, what a perfect beginning to a spring flowers quilt.


Esther Aliu's snowdrop quilt square looks like our snowdrops did last year - popping up amidst snowflakes.  These are applique work - and be sure to look at her website here, there is an appliqued tulip square and tons of other amazing applique work!


Happy Creating!  Deborah

Friday, January 12, 2018

Friday Inspiration - Ultraviolet


You may have seen that Pantone's color of year for 2018 is Ultraviolet.  The bluey violet is one of my favorite colors!  Pantone is a company that standardizes color matching and gives color forecasts.  You can read more about their reasons for choosing ultraviolet here.

Ultraviolet is one of those color names sometimes used with reddish purples, so just searching for "ultraviolet" yarns or fabrics doesn't necessarily get you the right color.  I've come up with some nice possibilities for fiber enthusiasts if you're excited about creating a color of the year project.

Sweet Georgia Brown has a new color, Lupine, that I'm definitely going to be making something with!  It's on their Superwash Worsted and Tough Love Sock here - Eat.Sleep.Knit also has a fun and very addictive yarn game going on!


For fabric, how about Moda's marbled purple


or this Kaffe Fassett flowered cotton.


DMC embroidery floss is widely available at chain craft stores and has color #333 looks like a great ultraviolet.


And for adding something extra to that yarn work or embroidery, how about this seed bead I found at Fire Mountain Gems.


I'll leave you for this week with an excerpt from the purple poem in Hailstones and Halibut Bones by Mary O'Neill.

"Time is purple, just before night when most people turn on the light - but if you don't it's a beautiful sight. ..... the purple sound is the loveliest thing, it's a violet opening in the spring."  

That's how I interpret this year's color!

Happy Creating!  Deborah

Friday, January 5, 2018

Friday Inspiration - First Quarter Fiber Art Challenge

If you've been following this blog through the autumn and early winter months, you know I decided to push myself and participate in several bead/jewelry challenges each month.  I can't emphasize how much this has helped me get out of my usual box of how I approach my art work.  I wrote some about it here.  

When I was in art school, the ideas seemed to flow!  Every semester there were new assignments to work on, new techniques to push my art abilities, and people to share art making with.  People who were also working on the same assignments and with the same new techniques - and who showed me ways of approaching problems I'd never even considered.  I was scared to death of critiques when I first went back to school.  This is the culmination of each assignment where you present the piece you worked on and, hopefully, completed.  Everyone then talks about it - what went right, what went wrong, how they interpret what you've created.  These quickly became the classes I looked forward to most!  Sharing what I'd made and seeing what others created with the same parameters was not just educational, it was also lots of fun!

With all these things in mind, I've been looking for fiber art challenges.  I've found several that are specific to certain types of fiber art - such as quilting challenges.  I've found ones that are actually entering your artwork into shows.  What I would really like is a challenge that can be done with any type of fiber art, because I'm all over the board on what I like to work with.  And one that I don't feel the pressure of actually entering a show or gallery presentation.  Just something to work on that I'll be able to share with others who worked on the same challenge, talk about what we did, look at everyone's interpretations and inspirations .... have fun!

So I've decided to host fiber art challenges on this blog.  There are a LOT of people who read this blog - you can check out the always changing number of followers at the left.  And my analytics tell me that every month there are 20,000 to 30,000 page views.  I really, really, really hope that some of you out there will want to give it a try!

I'm going to try four a year.  There will be a photograph, painting, or piece of art that is not fiber art to work with.  Use any technique that is associated with fiber art - there's a lot to work with!  Make it big, small, somewhere in between.  Create something in a few hours or take all three months to work on it.  This can be the first time you've ever used this technique or something you've spent your life practicing.

At the end of March, I'll put up a link you can use to post a photo of your work and a link (if you wish) to a blog, Facebook page, or anywhere else you'd like to talk about what you created.  The rest of us can make positive comments about what we like best.  

Are you in??!!!  Great!!!  Let's get started with the first challenge!

The first quarter's challenge is a photograph I took on a frosty morning on our farm.  We get a lot of fog here and it often "freezes out" covering everything in sparkling diamonds.  I've been inspired by these wonderland creations for years and have always meant to create something based on them.  


Any way your inspiration leads you, go with it!  You might chose to work with the colors, or the theme of frost or winter, or something else that others would never even think of.  You might chose to copy the photo with fibers.  I'll post updates on my piece and cheer everyone on.  On your mark, get set, go!!

Happy Creating!  Deborah

Wednesday, January 3, 2018

Snowy Owl Hat


Here's my first finished knit of the year!  I developed it from several hats and used the traditional owl cable pattern.  You can make it in different colors for different types of owls - snowy owls are my model Charlotte's favorite!  I used MadelineTosh DK in Birch Grey for this one and Cascade 220 Superwash in Pumpkin Spice for a brown barn owl hat (I unfortunately did not get a photo before the hat went home with its new owner).  The hat shown in the photo is the larger child size and I've also given directions for a smaller child size.  Because it's a loose, slouchy hat, it will also fit an adult (but tighter) by using the larger child size and adding additional length where indicated.

I have not knitted from this pattern yet - I typed it in from my notes, so if you think (or know) there's a mistake, please let me know!  I knitted the smaller child's size and found a mistake already!  On the decrease rows, there should be a round of straight knitting after Row 1 (the row with a 14 stitch decrease).  I've corrected this in the pattern below.

Materials:
*1 skein DK weight yarn
*size 4 16" circular needle
*size 5 16" circular needle
*size 5 double pointed needles
*tapestry needle
*18 size 1/4" buttons - I made these ceramic ones
*black sewing thread and needle

Directions are for smaller child size with larger child size in the parentheses.  

Cable 2 back - slip two stitches onto the cable needle and hold in back.  Knit the next two stitches, then knit the two stitches from the cable needle.
Cable 2 front - slip two stitches onto the cable needle and hold in front.  Knit the next two stitches, then knit the two stitches from the cable needle.

Start with a tubular cast on using waste yarn.

Cast On - With about 3 yards of a contrasting color of yarn, cast on 63 (67) stitches on the size 4 needle.

Row 1 - knit 1, yarn over, repeating to the last stitch, which you knit.  You should have 125 (133) stitches.

Row 2 - slip the first stitch purlwise with yarn in front, move yarn to the back and knit in the previous row's yarn over.  Repeat this to the last stitch, which you slip purlwise with yarn in front.

Row 3 - knit 1, slip one purlwise with yarn in front.  Repeat to the last stitch, which you knit.

Row 4 - slip the first stitch purlwise with yarn in front, move yarn to the back and knit 1.  Repeat to the last stitch, which you slip purlwise with yarn in front.

Row 5 - Repeat Row 3.

Row 6 - purl 1, knit 1 to last stitch, which you purl.

Row 7 - you are now working on the right side of the hat.  Knit 1, purl 1 until you have one stitch left.  Place a marker and knit the next two stitches together, joining to knit in the round.  You should have 124 (132) stitches.

After joining, work in K1P1 rib for 1 1/2 inches - don't count the waste row in this measurement.

After you have 1 1/2 inches, remove the waste yarn.

Change to the size 5 needle on this row.  Increase 10 stitches in the next round as follows:
Smaller child size - *knit 12, increase 1*  repeat to last 4 stitches, which you will knit.  You should have 134 stitches.
Larger child size - *knit 13, increase 1*  repeat to the last 2 stitches, which you will knit.  You should have 142 stitches.

Knit the next round.

Owl Rounds:
Row 1 - knit 2, *purl 10, knit 5 (6)*, repeat and end with purl 10, knit 2.

Row 2 - knit across the round.

Row 3 - knit 3, *purl 8, knit 7 (8)*, repeat and end with purl 8, knit 3.

Row 4 - knit across the round.

Rows 5 and 6 - purl 3, *knit 8, purl 7 (8)*, repeat and end with knit 8, purl 3.

Row 7 (Cable Row) - purl 3, *cable 2 back, cable 2 front, purl 7 (8)* repeat and end with cable 2 back, cable 2 front, purl 3.

Rows 8 through 16 - repeat Row 5.

Row 17 - repeat a cable row.

Rows 18 through 22 - repeat Row 5.

Row 23 - repeat a cable row.

Row 24 - purl the round.

After you have finished the Owl Rounds, knit until the hat measures 5 (5 1/2) inches.  If making an adult sized hat, knit until the hat measures 7 1/2 inches.  You can adjust this number up if you like a slouchier hat.

Decrease rows:
Row 1 - Decrease 14 stitches as follows:
Smaller child size - *knit 7, knit two together, knit 8, knit 2 together*, repeat to the last stitch, which you will knit.  You should have 120 stitches.
Larger child size - *knit 8, knit two together*, repeat to the last 2 stitches, which you will knit.  You should have 128 stitches.

Row 2 - Knit

Row 3 - *Knit 6, knit 2 together*, repeat across round.

Row 4 - Knit

Row 5 - *Knit 5, knit 2 together*, repeat across round.

Row 6 - Knit

Row 7 - *Knit 4, knit 2 together*, repeat across round.

Row 8 - Knit

Row 9 - *Knit 3, knit 2 together*, repeat across round.

Row 10 - Knit

Row 11 - *Knit 2, knit 2 together*, repeat across round.

Row 12 - Switch to the double pointed needles in this row and knit

Row 13 - *Knit 1, knit 2 together*, repeat across round.

Row 14 - Knit

Row 15 - *Knit 2 together*, repeat across round.

Row 16 - Knit

Cut off the yarn leaving about 10 inches of tail.  Thread a tapestry needle and pull through all the stitches left on the needle.  Remove needle and pull tight.  Sew a few stitches across the pulled hole and work the yarn in.

Sew up the gap in the ribbing with the cast on tail.


Sew on buttons for the eyes.


Happy Creating!  Deborah


Tuesday, January 2, 2018

December Bead Challenges


Happy New Year!!  We ended up with surprise Christmas snow that was beautiful and not too cold - the best kind!  Baxter is growing by leaps and bounds and keeps us all pretty busy, thus my December Bead Challenges are just getting finished now.


Sarajo Wentling's challenge for December was two superimposed photos her husband Eric took.  This is what winter looks like around our place if you sub fir trees for the deciduous ones!

Eric Wentling
This photo reminds me of winter early mornings when the rain has stopped, the clouds are beginning to clear, and the sun peeks through.  These mornings usually have a good amount of frost over everything!  I've been playing with some frosty glazes and one was perfect for capturing the colors of those mornings.  I decided to make earrings using a couple of disc beads glazed with it and paired them with ice crystal quartz, some wintry looking pearls, and sterling silver.


Head on over to Sarajo's blog to see how she and others interpreted Eric's photo.

The only other challenge I finished this month was for Art Bead Scene Studio.  December's challenge artwork was a 1924 still life painting by French artist Suzanne Valadon.  


I love the richness of the background tapestry!  And even though winter is just beginning, the tulips made me wish for my tulips that fill the flower beds.  I used terracotta for these beads and painted them in the majolica tradition.  See how others interpreted the painting in jewelry and beads here.


I kept two for myself (for some earrings to dream about spring on) and put the other four up in the shop at stoneypointstudio.com.

Stop by tomorrow for my first fibers post of the year and a knitted hat pattern!

Happy Creating!  Deborah